How much does it cost to replace a toilet wax ring?

How much does it cost to replace a toilet wax ring?

How much does it cost to replace a toilet wax ring?

On average, homeowners pay around $243 to fix a broken toilet. The cost can usually range from $148 and $349. In some cases, a professional plumber will charge a flat rate for a project. This rate may be affected depending on the location and the complexity of the project.

Some plumbers charge an hourly rate of $45 to $200 per hour for their services. In rural areas, the cost of hiring a plumber is usually around $45 to $75. However, take note that this is a finicky job and you may need to give a tip to your plumber depending on what you have agreed.

But first what is a toilet wax ring? Behind every good toiler is a good wax ring, which is exactly what it sounds like. It is a ring made of sticky wax located beneath your toilet. IT helps form a watertight seal between the sewer pipe and the bottom of your toilet.

It doesn’t need a lot of maintenance – not until 30 years later or more. But sometimes, wax rings can dry out and crumble. When that happens, you need to replace them as soon as possible.

Can I DIY Toilet Wax Ring Replacement?

A toilet wax ring replacement is not at all a time-consuming task. However, since it is a finicky job, it is better left to a professional who can do it better. It is one of those plumbing repairs that homeowners complain about as the seal often leaks after the installation.

Unfortunately, not everyone has success in ascertaining what the real problem is. You usually must use another fresh wax ring once you have botched the job. You have to center and lower the heavy toiler correctly on the bolts where most installers fail.

So when would you need to replace the toilet wax ring? Well, if you notice any leaking around the base of your toiler, the seal may be broken. Assuming you are introducing another bathroom floor, you will probably need to eliminate the latrine to tile up to the base. This requires a wax ring substitution. Another case, if your sewer upholds, as this regularly breaks the seal. You will know whether it’s messed up by leaking liquid around the base.

Replacing toilet rings gets especially tricky. And if there are dips or bulges in the area of the floor that houses the toilet, you need to watch out for it too. Sometimes, you might even need to stack two rings to compensate for the gap.
Broken seals are not usually a big issue unless you have no spare bathroom to use. If your encounter this problem, we suggest that you call a professional right away just to ensure that the job is done right.

How to Replace Your Toilet Wax Ring

Wax rings are available at most hardware stores for just $10 or less. If you can buy and do it yourself, the following tools are what you need.

  • Adjustable wrench
  • Putty knife
  • Bucket
  • Towels or paper towels
  • Drain, Dry & Disconnect

Turn off the water supply line that leads from the wall to your toilet.

Just run your hand on the valve but if you haven’t moved it for several years, it might be hard to turn. You need to flush the toilet to bail as much water as possible from the bowl and tank.

Otherwise, you may have to utilize a combination of plunging and bailing. In this case, you can use a manual vacuum. You can also bail by hand or sop up with towels to get the bow fully dry. Next, disconnect the water supply from your water tank to the bowl. When you notice a little water coming out of the line, prepare your bucket to catch it.
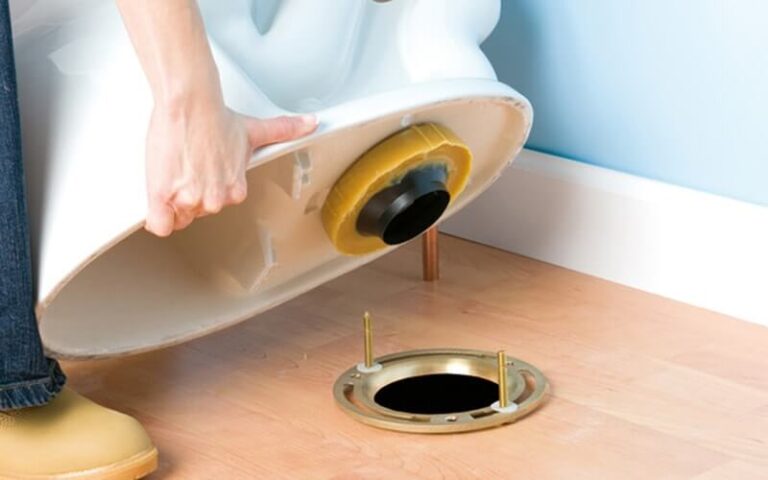
Remove the Toilet

As we have said, fixing the ring wax cannot be done by a single person. If you want to do it yourself, you need someone to assist you because at this point you will be removing the toilet. Also, remove the protective caps that cover the bolts at the base of the toilet using an adjustable wrench. Once all caps and bolts are removed, just twist the toilet a bit and you should be able to loosen it up.

When you are ready, get a good grip and pull the bowl. Lift with the knees, and pull it straight up. Then you can set it aside.

Scrape the crumbing wax away

This is actually where the real work starts. Use your putty knife to remove as much of the old wax ring as you can. Start from the bottom of the toilet to the pipe fitting on the floor.

Once you see the flange, you need to clean and dry it too. Assess whether there is any debris left on the position and once everything is ready, you can proceed.

Place New Wax Ring

Nowadays, you will find self-adhesive wax rings in the local hardware near you. You should also see a small design variation among brands. Hence, you need to take closely what brand you have previously used.

Most wax rings can either be affixed to the bottom of the toilet or the top of the flange. Simply choose whichever you are comfortable with. Once you have successfully installed the wax ring, you can install your toilet back in its position. Make sure that the bolt holes are aligned with the holes in the flange.

Take a Seat on your Toilet Bowl

Close your toilet bowl cover and sit on it. Use your weight to apply pressure and compress the wax ring into place. Shift your position as needed and feel the fixtures at the bottom.

In the end, your goal is for your toilet to flush properly. With the done, simply replace the mounting bolts and bolt covers. Then reattach the water supply line to the tank. Once everything has completely dried and realigned, reopen the supply line valve.

Flush your toilet to test. Make sure that no water goes to the floor. If there is no leak, then it means you have done the job right.

Home Pro Partners

Home Pro Partners

Skilled laborers... publish a Home Pro Partner profile and invite trusted referral partners to your company profile.

Reach new customers with Home Pro Partners, no lead fees, no gimmicks, no hassle.

Which colors make a room look bigger?

Which colors make a room look bigger?

Which colors make a room look bigger?

Small rooms can be tricky to improve. Besides the limited space, having too many items and furniture can make it even smaller. What you don’t know is that colors can have a huge impact on the size of your room.

If you have a small room, you can make it look even bigger by the choice of colors. Dark colors usually make rooms smaller. But lighter colors such as the shades of nudes or white can make rooms look fresh, cozy, and breathable.

Stark White

Naturally, white is an obvious choice for making a small room feel lighter, bigger, and cozier. It makes the interior a classic and timeless piece. Eggshell or satin finishes are the most popular when it comes to the white shade.

The simplicity of white makes it easier for you to decorate your room because it matches almost all other color combinations. With white walls and ceilings, you can choose from dark, bold, to colorful furniture.

What’s more, it works regardless of your choice for aesthetics. Whether you want a modern kitchen, a minimalist room, or a country-inspired living room, white makes a great palette for any part of your home.

Light Taupe

If you are not willing to go entirely white, you can go with light taupe. This neutral color makes a small room look bright and airy. It is still bright enough to allow light to reflect in every wall but it also adds a touch of warmth.

The expensive tone is commonly used in hotel rooms with small spaces. Just add a little architectural detail to give your room stature. It helps to add nude furnishings to keep the air feels in the room.

Blush Pink

Blush pink is another timeless color you can use to brighten up a small room. It gives the room a feminine touch that looks even more wonderful at sunset hour. This hue can work best with white embellishments and decorations. You can also hang a Scandinavian or geometric wall frame on the biggest side of the wall.

Other tones that will match your blush pink wall are beige, sand, and ivory. If your walls are painted with blush pink, you can have a different tone for your ceiling to add a curb appeal. White or cream paint can definitely look best above and for the moldings as well.

Dark Navy

If you want a strong and bold ambiance without playing with the neutral tones, the safest option is dark navy. The deep navy hue can still make a small room feel big and cozy depending on how you use it. The key is to find the proper blend of wall paint and room décor.

Paint your walls with dark navy to give your room a dramatic and stately feel. However, you can use white tiles for your floors and white paint for your ceiling and moldings. A combination of the gray and white frames can give contrast to your walls. For your bed and furniture, you can opt for creamy and white covers. Or you can even experiment on floral blue tones and hues.

Cool Gray

Who says gray is a dull color? A great alternative to white paint color is a light cool gray. As you paint your walls white, you can have your doors and furniture in gray. A cool gray and white combination can definitely look fresh and breezy when used it.

It creates a visually appealing and cozy room. This is a perfect combination if you want to moderate the use of nude tones, which are apparently more feminine.

Nobody has gone wrong with this combination. As a matter of fact, it is an ideal choice especially if you want to create a minimalist ambiance but still want to maintain an expansive feel.

Earthly Ochre

Earthly ochre is a deep and warm color that creates a perfectly warm environment. It’s an ideal option if you don’t want too much brightness brought by white color. The light tan can bring a warm feel especially during daylight yet it still makes your room look bigger.

Warmer tones are pleasing to all the senses. It makes you feel comfortable as you stare in admiration at the spaces of your room. You can use it for your bedroom, living room, or kitchen. You will never go wrong with its neatness and cleanliness.

Sea Green

Sea green is an ultimately popular choice of color especially for those who are living near the beach. It’s cool and warm at the same time. It is the perfect color if you want to achieve a minimalistic vibe yet still bring the coolness of the ocean to your own space.

The sea green color sets a nice mood for any room. As it is almost closer to turquoise, it echoes sea waves and cool waters in your senses. You can accentuate your room with furniture and decorations in earthly tones.

This way, you can enjoy heaven and earth right in your small space. Perfect, isn’t it?

Charcoal Black

If you don’t want to utilize nude and white elements for your room but still want to make a small space look big, you can experiment with charcoal black. This color might be dark but when used wisely, it can make your room feel more intimate rather than stuffy.

For example, you can use charcoal black for your walls but you can use white or creamy paint for the moldings and ceilings. Try to add shiny wooden furniture to accentuate the space. Add some sparkling gold tones for your lampshade or lights perhaps.

Anything that shimmer catches attention and when contrasted with black will definitely look more attractive. Pair your charcoal black room with more sophisticated accents such as white and gray, or even light blues or purple.

The key is with the right combination of elements. In any case, dark charcoal black is an elegant color. As long as you don’t add any red tones to your room, black will give you a grand open space.

Wild Fox Painting

Wild Fox Painting

Guest Writer

Wild Fox Painting is focused on providing Trustworthy, Reliable and Respectful interior painting solutions for your home.

View Pro Profile

How long does it take to retile a bathroom?

How long does it take to retile a bathroom?

How long does it take to retile a bathroom?

Retiling your bathroom? There are several different factors to consider when planning your bathroom renovation. If you ask how long it takes to replace your old tiles and install new ones, you should be sure not to miss any details out as this could cost you some time and money later.

We have listed below the key factors alongside useful information to help you assess the time and money needed to retile your bathroom.

More Bathroom Fittings Means Longer Time For Retiling

When retiling your bathroom, you also have to think about your bathroom fittings. While this may seem like common sense, the cost and time for bathroom retiling may vary depending on what is being fitted in your bathroom.

Typically, when you have installed more fittings the more time it will take to retile your bathroom because you will need to remove these fittings first. Moreover, there can be expected delays in retiling the bathroom.

Hence, it always makes sense to have a compilation of what needs to be fitted into the room if you are replacing your old tiles. By doing this, you get a clearer idea of how long it will take for retiling to complete.

  • Baths
  • Showers
  • Basins
  • Tiles
  • Radiator
  • Extractor fan
  • Flooring
  • Lighting

The most time-consuming task is to include a new bath or shower. When you retile your bathroom, you may need to remove the fixtures and reinstall them back once the tiles have been glued completely on the wall. Moreover, you may need to wait for the grout to dry as well.

Once you have a full list of your fittings, you can estimate the time within which your bathroom retiling project may be done.

Who is Constructing Your New Bathroom Suite?

Are you doing it yourself? Are you hiring a professional handyman to install bathroom tiles for you?

While on average it takes around a week or two to retile your bathroom, the duration may vary depending on who is going to retile your bathroom tiles. If you are hiring two or more professionals, the retiling may go faster.

Bathroom fitters can certainly work fast. Moreover, having more people to work on various tasks during the installation can make the project simpler. For example, some individuals may be assigned to do a particular task such as framing, cabinets, and countertops. Another group of professionals will take care of toilet installation and plumbing.

Take note that hiring more people to work on your bathroom may also require an extra budget. You need to strike a balance between your time and your cash. If you are busy DIY and you need to retile your bathroom, you have no choice but to hire professionals.

But if you are confident, you can carry out a project like this, you may do so. While it may sound ambitious to retile your bathroom, it won’t matter as long as your bathroom is not too big and you have the necessary tools for the project.

Position of Your New Bathroom

Another factor that affects the time required to finish retiling your bathroom is whether or not you would want to positive your new bathroom suite. If the answer is yes, then it would take around a month for the project to finish.
Repositioning your existing suite may require additional plumbing work and a full tiling job. The different bathroom layouts and the number of fittings can also add to the total time of the project.

The bigger your project, the longer it will take to finish retiling your bathroom. It is wise to keep a list of bathroom refurbishments needed to complete the project. With a clear list of everything you need to, you can map out the room properly.

If your bathroom has a new layout and position than the previous one, you are inevitably going to take more time. At least, you have your list handy because either you or the handyman will have to follow the same list.

The Bottomline: All you Need to Know About a Bathroom Retiling Project

A full retiling project can take up to a day. However, this typical timeframe may be affected by a lot of factors such as who is doing the project, how many fittings you have, and whether or not you have people skilled to carry out the task.

Moreover, you also need to take into consideration the size of your bathroom. Bigger bathrooms need more time to finish because it requires more tiles to be installed. If you have a smaller bathroom, you can finish retiling it in just one day. As long as you also have the right tools and materials, doing it yourself will not give you so much to worry about.

If you have no understanding of tiling, you need someone to carry out the job for you. Tiling walls can be a quick job with the right person. Even so, you also need to think about how the job is carried out.

Since the bathroom is one of the most essential parts of your home, we suggest that you should compromise the quality with time. If it takes a month to install tiles of the highest quality, we advise that it is already a good deal.

If you are looking to achieve a flawless tiled bathroom, choose someone experienced and skilled to do it for you. The end finish will be worth it. It is also something that you can be proud of in your bathroom as a homeowner.

Moreover, while bathroom renovation costs can be on the higher side, it is always worth the investment in the long run. Homes with retiled and refurbished bathrooms can also increase in value. So for a quality finish across all of the different elements, do not hesitate to call an expert.

Home Pro Partners

Home Pro Partners

Skilled laborers... publish a Home Pro Partner profile and invite trusted referral partners to your company profile.

Reach new customers with Home Pro Partners, no lead fees, no gimmicks, no hassle.

Why is my ceiling paint cracking?

Why is my ceiling paint cracking?

Why is my ceiling paint cracking?

Have you ever looked up you’re ceiling and observed cracking and peeling paints? Ceiling paint cracking can occur for several reasons. It can happen because of excess moisture or improper painting techniques.

But for whatever reason it is happening, you must resolve this issue right away. Cracked paint on the ceiling is untidy to look at. The process can be long and tedious but with the help of professional painters, your ceiling can bounce back to normal in no time.

4 Most Common Causes Peeling Paint on Your Ceiling

Moisture

In places where the humidity is high, moisture can quickly build upon surfaces. It can build on your walls, floors, and ceilings. Since ceilings are very hard to reach, the moisture there can stay for longer durations of time, which will, later on, affect the condition of your paint.

Some rooms that are prone to cracked paint are bathrooms, comfort rooms, and kitchens. However, paint cracking can also happen in your bedroom depending on the humidity level.

Water Leak

When the moisture reaches the ceiling, it will make itself known in many ways. First, you will notice that the paint bubbles up, which means it still has water inside it. As time goes by, these bubbles can turn into cracks and your paint will start fading and peeling off.

Soap Build Up

This happens in washrooms, bathrooms, and comfort rooms. When you take a bath, the steam can go up and stick to the walls and ceilings. If your paint is not water-resistant it can crack and peel over time.

Candles

You should be careful where you light your candles. Just because your ceiling is high doesn’t mean that the smoke from your burning candle does not reach up. If there has been lots of smoke or even fire damage, the first sign of damage can happen in your ceiling.

Other Causes of Cracked Paint on Your Ceiling

  • Water
  • A dirty surface and poor surface preparation
  • High temperatures and intense sunlight
  • Too many layers of paint
  • Many different coats of paint on the same surface
  • Low-quality paint
  • Expired paint
  • Extreme dryness
  • Corrosive substances

How To Get Rid of Cracked Paint in the Ceiling

Cracked paint in the ceiling can happen both in new and old homes. However, it can become an eyesore if not fixed. If you happen to see cracked paints on your ceilings, it is important to remedy the damage right away.

Simple problems can lead to bigger ones when not repaired. Below, you will learn some tips on how to get rid of cracked paint in the ceiling.

Reduce Moisture In the Attic

Moisture can come from a lot of sources. But for most homes, moisture comes from the attic and slowly permeates in the ceiling. If you have a drywall ceiling, moisture can move faster into the paint.

To prevent moisture from reaching the top, make sure you adjust your home humidity. A home humidifier can bring great help for homes that suffer from high humidity levels. On the other hand, inspect your home for leaks. Water could be leaking from your roof or pipeline.

Furthermore, check for mold growth. Moisture can also develop from molds in your home. During your inspection, try spot spaces where molds usually growth such as in the corners of your ceiling. If you are using steel trusses, they may be corroded, which will also lead to moisture build-up.

Be careful when moving around. If you can’t do it on your own, do not hesitate to contact a professional to do it for you.

Use a Compatible Paint

If your ceiling is leaking, it is possible that the paint you are using is not compatible with the materials used to build your ceiling. For example, if you have applied oil-based paint directly on top of latex paint, cracking will happen at some point. This is because latex paint is porous and will allow moisture to penetrate.

If this is the case, you may have to completely repaint your ceiling. First, try to strip the old paint from your ceiling. If your ceiling is made of wooden materials, you can easily DIY the process. Before applying new paint, sand and scrape the remaining paint.

This helps clean up the space and prepare it for the new paint. Other ceiling types are harder to fix. By hiring a professional painter, you will get the job done right.

Prep Your Ceiling Well

In case you are repainting your ceiling, it is important that you prep your ceiling well.

If the paint is applied on an uneven surface, it won’t take long before the new paint begins to blister. Sooner or later, the same problem would occur.
Other factors such as incomplete joint compounds and improperly placed seam tapes can affect the permeability of your ceiling. Hence, make sure that you prep your ceiling well before applying the new paint. Remove all the dirt that sticks on your ceiling – not just the cracked paint – but also some cobwebs, dust, and built-up sediments.

Prime The Surface

Before anything else, it is ideal to prime the surface. There are excellent primers in the market that you can invest in. Primers help cover up the surface and secure possible holes where the moisture would usually go through. It blocks pores and also provides a great guard against mildew and watermarks.

If you are priming your bathroom, you may need to use oil-based or stain-blocking primers. Since bathrooms are prone to water leaks, steam, and moisture, an oil-based primer can help block as much water as it needs.

Maintain Your Ceiling

Just because you have painted your ceiling doesn’t mean you can stop caring. Proper home maintenance can prevent the same problem to occur in the future. Hence, make sure that you keep water-prone parts in check. Monitor your pipelines and make sure no parts are leaking.

Wild Fox Painting

Wild Fox Painting

Guest Writer

Wild Fox Painting is focused on providing Trustworthy, Reliable and Respectful interior painting solutions for your home.

View Pro Profile

Can a concrete driveway be resurfaced?

Can a concrete driveway be resurfaced?

Can a concrete driveway be resurfaced?

Wondering if you can resurface your concrete driveway?

Concrete driveway resurfacing is a great solution to improve your home’s curb appeal without spending too much time and money on the repair. Instead of ripping off your concrete driveway and completely replacing the old concrete, you can opt for this idea.

Resurfacing surface is ideal for cracked, discolored, dated, or damaged concrete. It basically uses coating or overlay to transform the appearance of your driveway.

How Do you Resurface Your Driveway?
Concrete driveway resurfacing is also known as concrete refinishing. It involves refilling the surface with a hunk of new concrete and adding more finishing touches to it to make it look more attractive. It requires the right tools and products to achieve a seamless result.

If your concrete driveway is showing cracks and damage, you can use a sealer or filler to fix them. The following are steps on how to refinish your concrete driveway.

  1. Clean the surface. Remove all dirt, oil, and other debris from the surface. You can use a pressure washer to remove dirt and grime, instead of brushing or sweeping them through. The concrete has to be thoroughly clean to provide a better canvas for your concrete coating.
  2. Prepare the surface. It is best to acid wash the surface to create a porous structure. This allows the concrete overlay to bond better to your existing surface.
  3. Mix your materials. Combine your overlay components to prepare for application. Add grit additives or coloring agents depending on the end goal that you want to achieve.
  4. Apply the coating. Spread the mixed overlay onto the area. Use a trowel to evenly spread them on the surface and wait for a couple of hours for the coating to dry. Depending on the density, it usually takes at least 24 hours for it to dry. Always consult the product label if you are doing it yourself.
  5. After waiting ample time, you can seal the surface. A concrete sealer is a protective coating that will keep your driveway looking its best.

Can I Resurface My Concrete Driveway Myself?
Well, it is possible that you can resurface your concrete driveway yourself. As long as you have tools and experience in resurfacing, you should be able to carry out the project smoothly. However, if you have no prior experience with concrete driveway resurfacing, we suggest that you hire a professional handyman to do it for you. Proper application is a must for concrete driveways.

Take note that your vehicle will pass over it from time to time. When not done well, your driveway could be damaged by the weight of your vehicle. In the end, you will have to redo the process. With this, you should also be aware of the possible issues with concrete resurfacing.

  • Inclement weather such as rain, humidity, and extremely hot weather can interfere with the quality of your resurfacing job.
  • The improperly prepared surface can lead to additional damage in the long run. If your surface is not cleaned well, it is possible that the filler and sealer will not properly bond with the concrete.
  • Product not applied evenly can lead to bulky and lumpy surfaces. If you don’t have the right tools, you may end up with splotches that look inconsistent with the rest of your surface.

How Much Does It Cost To resurface a Concrete Driveway?

The average cost of concrete driveway overlay can vary depending on your location, project size, and professional fee. On average, the cost is about $3 to $20 per square foot. The following are factors that may affect the cost of your concrete driveway resurfacing.

  • Condition of your existing surface
  • Additives you want to include
  • The number of colors you choose
  • Design work involved

The following are some concrete coatings that you can choose for your driveway.

  • Abrasion-resistant
  • Decorative options that meet your desired design
  • Ease of application
  • Fast curing
  • Good adhesion
  • Low in harmful VOCs

Can I use Epoxy to Resurface My Driveway?

If you are considering an epoxy driveway, you also need to consider the cost and time. Even so, epoxy can be a great option for driveways because of the following reasons:

It takes longer to cure. The curing time for epoxy coating is quite longer compared with a concrete coating. Since you are applying on your driveway, you run the risk of exposing it to heavy rains and other harsh weather conditions that may destroy your driveway.

Moreover, the longer it takes to cure, the more dust and debris can stick on the surface. It is nearly impossible to control these elements considering that your driveway is exposed to open space. If you are getting unexpected rainfall, it will also affect the quality of your driveway.

However, epoxy coating is great for garages. They’re durable and efficient for your tires. Since garages are covered with roofs, you won’t have any issues with unexpected changes in weather conditions.

The presence of moisture can loosen up the adhesion. An epoxy coating can only be done best when applied in a controlled environment. However, for an inexperienced individual, there is a high risk that your epoxy will be exposed to factors that can affect its quality. These include sudden rainfall, falling debris, and many more. The cause is often due to lack of experience or lack of tools.

There is a high tendency of discoloration due to the UV light coming from the sun’s rays. Unless your driveway is covered, the sun rays can negatively impact the color of your driveway.

This is why we don’t usually recommend epoxy coating on uncovered pathways. While it is long-lasting and durable, prolonged exposure to the sun can cause it to become yellowish.

The Bottomline
In general, resurfacing is an ideal solution if your driveway has dents or damages on the surface. It helps it to look good again. However, if your driveway is completely wrecked and you want it to look better, resurfacing is not the only solution you can opt for. When your driveway is completely damaged, you may need to redo the whole structure.

Home Pro Partners

Home Pro Partners

Skilled laborers... publish a Home Pro Partner profile and invite trusted referral partners to your company profile.

Reach new customers with Home Pro Partners, no lead fees, no gimmicks, no hassle.