How sensitive are fire sprinklers?

How sensitive are fire sprinklers?

How sensitive are fire sprinklers?

How sensitive are fire sprinklers?

So how sensitive are fire sprinklers? Whether you are staying in a hotel with a fire sprinkle or you have a fire sprinkler in your home, you must be aware of its effects.

It’s easy to take for granted simple protection and prevention devices such as fire alarms and fire sprinklers. But these devices, most especially fire sprinkles have high sensitivity.

As a homeowner or hotel owner, you may need to understand what fire sprinkles do and how sensitive they are so you won’t use them to your disadvantage.

What is Fire Sprinklers?

Fire sprinklers are devices that trigger the flow of water whenever a fire breaks out. It is commonly placed on the ceiling and is installed by groups. In a nutshell, it is composed of a system of piping that is sometimes connected to a fire alarm system. When a fire breaks out and the fire alarm sets off, the fire sprinkler automatically releases water to attempt to put off the fire.

Do not mistake the fire sprinklers with the smoke detector. Oftentimes, a smoke detector can set off the fire alarm when smoke from anything that is burning or even from a cigarette reaches the sensor. However, smoke is not enough to set off a sprinkler.

However, because smoking is now prohibited in most public buildings modern smoke detectors are more sensitive than models from years past. In more advanced buildings and structures, when the smoke detector detects smoke in the vicinity, it also triggers the sprinkle.

How do Fire Sprinklers Work?

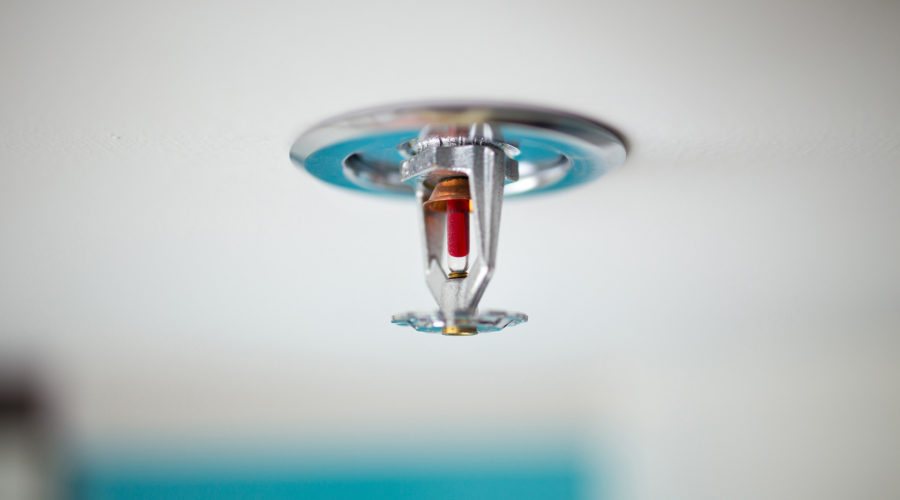
A fire sprinkle is a small device attached to the ceiling. It has a small glass bulb containing a heat-sensitive liquid or the less common fusible metal link. Once a fire heat reaches this part, it triggers the sprinkle head to release water.

While it doesn’t pour out a pail of water, it releases water like a rain shower. Ordinarily, it is fast enough to put off a developing fire. For example, the most common sprinkler you can find in your local hardware store is the one with red glass. This device will activate when the temperature reaches 155 degrees Fahrenheit.

Can Vapor from e-cigarettes set off the fire sprinkler?

Unfortunately, no. As you may be aware, e-cigarettes can produce vapor like other devices such as vapes. While they can trigger a smoke detector and the fire alarm, the vapor itself is not enough to set off the fire sprinkler.

In the case of ionization smoke detectors, the alarm is triggered when particles disrupt the flow of electricity. On the other hand, optical smoke alarms activate when particles scatter an infrared light beam.

With this capability of smoke detectors and fire alarms, it is highly advised to not place them in areas where you usually smoke. Some of the places where you should not put a smoke detector are in the bathroom or kitchen.

Having said that, vaping or smoking an e-cigarette is not enough to trigger a fire sprinkler.

How much fire can trigger a fire sprinkler?

Fire sprinklers are designed to be quite sophisticated. While they are sensitive to fire, it usually requires between 155-165 degrees Fahrenheit before they can release water.

Moreover, the sprinkler heads are activated individually. That means, if there is a fire in your room, only the sprinklers in your room are activated. The rest of the fire sprinklers around your home will not release water.

This particular functionality is important because it prevents further damage to the entire building. In the usual course of business, only one or two sprinklers are needed to successfully contain and extinguish most fires.

Why is it important to have fire sprinklers in my home or establishment?

Fire sprinklers are very important devices that you can install in your home or your establishment.

They can catch flames at the earliest chance possible to prevent them from getting bigger.

While many people believed that fire sprinklers can cause more destruction as water is released from the sprinklers. However, sprinklers can limit the heat and smoke that usually damage a small area of the property.

Moreover, it buys people valuable time to exit the building safely. Sprinklers are a must for bigger homes and buildings. Fire sprinklers are required by government authorities among business establishments.

What are the myths of fire sprinklers?

There are many myths about fire sprinklers, which prevent people from investing in these devices. In this section, we will debunk some myths related to fire sprinklers.

Myth 1: There’s a big risk that fire sprinklers will lead to an accident discharging water and destroying the things indie the home and establishment. The truth is, there are only 1 in 16 million risks of fire sprinklers activating without fire. Ideally, fire sprinklers must detect the presence of fire to set off.

Myth 2: A smoke detector provides enough protection.
There’s no denying that smoke detectors can help warn you of rising smoke. However, it is important that you also have a fire sprinkler in place to protect your home from sudden fire. The best thing about fire sprinklers is that they can set off automatically once there is fire. Before you reach the affected area, the fire sprinklers have already worked their wonders. This is very helpful especially if you have kids in the home. A fire sprinkler can buy you time to get out of the house before everything gets worse.

Myth 3: Residential fire sprinklers are too expensive and will make housing unaffordable.

Home sprinkler requirements are now recommended in all major “model” fire codes to keep homes safe ad secured. While there are majority groups who block the requirements of home sprinklers in homes, they have also spent some millions on the campaign.

What we want to you think is this: While sprinkles can incur added cost during installation, they can also increase the value of your home. Years from now, your sprinklers will still be working well. As homeowners start to look for homes with sprinklers, your home could be a priority choice.

Home Pro Partners

Home Pro Partners

Skilled laborers... publish a Home Pro Partner profile and invite trusted referral partners to your company profile.

Reach new customers with Home Pro Partners, no lead fees, no gimmicks, no hassle.

Should ceiling color match trim and molding?

Should ceiling color match trim and molding?

Should ceiling color match trim and molding?

When building home ceilings and moldings are always a priority. Well, painting your room is a magical moment where you get to enjoy the chance to customize and improve the curb appeal of your home’s appearance.

Of course, it is normal to think about what’s best for your room in terms of painting and decoration. Or whether matching the colors of your ceiling and molding would be advantageous for your situation.

Well, there is no hard and fast rule when it comes to painting your ceiling and moldings. This choice is truly a matter of personal preference. However, most homeowners agree that having a matching trim and ceiling can add a unified, neat look to any home.

If you opt to have a variation in color, it can help to turn your trim into a statement item. Remember, this is one of the first few things that your guests will see. And although you may not often have guests, it is always great to create an impression. To make your painting session easier, we have outlined the basics of painting your trim and ceiling.

Why Do You Have To match Your Ceiling Color with The Trim and Molding?

It creates the illusion of a larger room

It is true that a uniform ceiling and trim can make your home look neat. Moreover, it can add contrast to your walls and make your space look bigger. It creates an attractive visual effect, which is why most major interior designers would advise this.

It harmonizes the Space

It gives your room a unified feel and harmonizes the colors of your interior. Did you ever see a room that just felt like it was perfectly designed to match up everything? That’s usually what you usually get with applying professional painting techniques to your space.

It emphasizes your wall color

Matching your trim with your ceiling and having a different color for your wall is ideal for any home. This technique helps emphasize the color of your wall and brings out the rest of the elements in your home. If you have a modern wallpaper design, you can bring attention to it by having a classic color trim and matching it with the color of your ceiling.

Generally, it is important that you match things up in your home. The proper combination of the various elements in your home can make your interior stand out.

The Benefits of Trim and Molding Application

The trim and molding of your home can add a characteristic to your home. The casings can also add a personality to your interior feelings, depending on the design and color. Add trim and moldings to your home to raise the curb appeal and distinction to your home interior.

Starting at the Floor

So now that you have decided to match your ceiling and your trim, let’s talk about how your baseboards are going to be. Baseboards are moldings that are placed at the bottom of your wall. They set the aesthetical foundation to every room in your home and create a boundary between the drywall and the floor.

When matching you’re ceiling and your trim, you might as well match the color of your baseboards. Baseboards should be throughout the home to ensure a transition from room to room. Tie decorative baseboards to match the architectural design to create your desired ambiance for your home.

Door Jams and Casings

Door casings can help define the entrance to your room and protect the area around the door.

However, it also helps in improving the appeal of your home. Most homes would match their ceiling, trims, and door casings. Then create a contrast by painting the walls with a different color. For example, you can have a white ceiling, trim, and door casings, and beige or ivory for your walls.

This will bring a classic appeal and unique warmth to your ambiance. Feel free to play with any color. The key is to have the proper combination of colors that will look good together.

Crown Molding

Installing crown moldings can raise the appeal and elegance of your home. You can run it across the upper wall and the ceiling. Depending on the design, the crown molding will send either a bold or classic vibe. The design and color bring the character of the crown molding.

Match the styles of baseboards and crown trim to complete our room. Door casings don’t really have to match the base sheets or moldings. Keep the door casings easy to stay away from over incitement assuming the base sheets and crown moldings are fancy.

Contrast paint colors of the dividers and moldings to conflicts of colors. Play around with the trim and moldings to customize your living space.

What is the Best Color For Your Trim?

When you are trying to select a color for your trim, you can go by the popular opinions. You have to take a look at your room’s designs and the rest of the colors in your home to create harmony. Check these guidelines to help you.

  • Apply light color in high-traffic areas. Lighter colors like white, cream, beige, or ivory can create the illusion of a bigger space. It makes the area light and airy. It also helps conceal dust and grime that have accumulated in the room.
  • Rooms that are aiming for a more dramatic appeal must consider getting darker trims and finish. However, if you are matching your trim to your ceiling, this may look your room a little “squashed.” If you want to utilize darker colors, we suggest painting them on your wall. For example, you can utilize dark charcoal or your walls and white for your ceilings and trims.
  • Light shades are ideal for hiding moisture buildup. For areas that usually accumulate moisture like the bathroom and the kitchen, you can paint them with lighter colors.
  • Try to match the trim’s shade with the surrounding decorations and colors. If you have a bright green carpet, it is okay to go a little with your colors in surrounding areas. Depending on the mood that you want to set for your home, your choice of colors can greatly vary.
Wild Fox Painting

Wild Fox Painting

Guest Writer

Wild Fox Painting is focused on providing Trustworthy, Reliable and Respectful interior painting solutions for your home.

View Pro Profile

How to de-winterize Sprinkler System

How to de-winterize Sprinkler System

How to de-winterize Sprinkler System

So how do you winterize your sprinkler system and why do you have to do it? While winter is a time for everything to freeze, springtime means it’s about time to start up your sprinkler systems again.

Warmer weather conditions can make grass and plants wither, which is why you must have your whole sprinkler system working. However, when you do so, you also need to do it right away to avoid damaging pipes and irrigation components.

Today on the blog, we will tackle some steps to ensure that you get your sprinkle system back to work.

Step 1: Slowly open the main water valve to the system

Opening the valve slowly fills the pipes with water. The speed of how you open it matters because if you open them too quickly, the water can put a high surge of pressure on your main lines. The uncontrolled flow of water can instantly damage the pipelines doubling your work and financial liabilities.

If you’re not aware of the valve location, try to look in your basement. You should be able to see piping coming into the home near the ground level. This piping should have a single shutoff valve – this is the valve that we are looking for.

The valve resembles a ball form with a lever-type handle. If you see another large water pipe coming from the ground level, this is probably your home’s main water supply. So don’t touch it because it is not the valve we’re looking for.

STEP 2: Manually Check each zone and activate

We always suggest not making everything rush. Many homeowners who try to bypass the process in de-winterizing sprinklers have encountered issues like pipes breaking or valves malfunctioning.

Since winter can also cause issues to your pipeline, springtime is your best chance to check on these problems. First, verify the proper operation of each station valve. Spot issues in the areas. Some valves may have tilted or sunk.

Also, walk through and check each zone whether they are functioning as they should. Is there a low pressure in your sprinkler system? Then, maybe you have broken a line.

Also check for proper rotation, clogged areas, clogged filters, and poorly performing sprinklers. When you spot some issues, you have to remedy them right away.

Every time you remedy a problem, that is also the perfect time to activate the zone.

Step 3. Reprogram the controller

Reprogram your sprinkler system controller for automatic watering. If you are using a battery, you may need to replace it when needed. It is a good idea to set watering times depending on how much you want to water your plants.

If you are using a sprinkler for your lawn, you can set the timer once during the day and in the afternoon for the whole springtime duration. This is enough to keep your grass green all through the springtime. If you have a larger plantation, you may need to adjust accordingly.

Remember, when the warm weather gets going, will your grass grow rapidly with a sprinkler system. Check your lawn regularly to make sure it receives enough water to keep it healthy. If you have a movable sprinkler, monitor the time when you need to transfer it to water another part of your lawn.

Step 4. Uncover and clean the weather sensors when applicable

Not all sprinkle systems include this component. However, if your sprinkle system has this feature, make sure that it is working effectively. Weather sensors are features in modern sprinkler systems that automatically shut the sprinkle off and stop it from watering during wind, rain, and freezing weather.

This is a very useful tool, especially if you are not always around in your home. That means when the sky suddenly turns gray and the rain starts pouring due to a cyclone or storm there’s no need for you to manually turn off your sprinkle. The sensor itself can spot the weather condition and prevent your sprinkler from watering the grass or plants.

Step 5. Get Ready to Water!

Once you have corrected all the issues in your water sprinkler, it is time to water. First, test your sprinkler and adjust spray patterns.

Keep an eye on the watering for the first time that you have de-winterized it. Make sure everything is working properly.

It is possible that during this time, some caps and damaged sprinkler heads can pop. You probably have not seen them when you checked on them. Even so, you must ensure your sprinkle is 100% de-winterized. When watering, make sure your lawn receives equal water so your plants remain green. Additionally, it is a good idea to soil during Spring. It helps the water and air to reach the root system and keep your plants or grass sturdy and strong amid the heat of the sun.

How To Prevent Sprinkler System Water Hammer

The most important thing to note when de-winterizing your sprinkler system is to turn the water slowly. This prevents “water hammer”, a condition that happens when a sudden change in water pressure escapes from the sprinkler. It occurs when you suddenly turn on the sprinkler and a sudden surge of water comes out.

This water could strike anywhere. Since the pressure is too strong, it could dig a hole in your lawn or even strike you. You will know when the pressure is strong because there is a noise inside your sprinkler, which is the water slamming against the inside of your sprinkler.

You must follow the steps above to ensure safety for everyone in your home, especially if you have a larger sprinkle.

Sprinkler System Maintenance

De-winterizing your sprinkler system is crucial. Since you need to do this every springtime, you must have a caring plan in place. Maintaining your sprinkler system can keep it functioning at its best.

If you do not know how to winterize or de-winterize your sprinkler system, do not hesitate to call out a professional maintenance team to help you. A professional can look after your sprinkler system properly.

Home Pro Partners

Home Pro Partners

Skilled laborers... publish a Home Pro Partner profile and invite trusted referral partners to your company profile.

Reach new customers with Home Pro Partners, no lead fees, no gimmicks, no hassle.

How long does concrete take to set before the rain?

How long does concrete take to set before the rain?

How long does concrete take to set before the rain?

So how long does concrete take to set before the rain? Can you pour concrete while it is raining? Water is a key component of all concrete together with sand and cement. However, after they are mixed, you need to dry them out completely before you can use them.

Typically, it takes 4-8 hours to dry cement. However, bigger projects may take longer. For example, if you are applying concrete for your garage or pathways, you may need to wait for days before you can use it. In another instance, 4 inches of concrete pathways can take as much as 28 days before it can set.

This is why it is very important to not pour concrete during the rainy season. The pouring rain can compromise the strength of your concrete and increase the tendency for dusting and scaling to develop. Once the damage has been done, it will be hard to rectify.

Tips When Pouring Concrete in Rain

Even with the presence of modern weather forecasting technology, there are times when the rain suddenly pours. Rain showers, for example, can develop without warning especially during the rainy season.

If rain is forecasted, you better postpone a large concrete pour until conditions get back to normal. Even if rain is not predicted, you should be ready with covers as part of your preparations. Make sure to seal the edges so rainwater can’t flow underneath.

Before the project begins, make sure that you already have surveyed the construction site. This helps you to identify areas where you can keep your cement safe just in case the rain suddenly pours. Moreover, you should have a contingency plan in place.

How to Handel Rain After Pouring Concrete

Here is how you should act when the rain pours down on your freshly placed concrete.

Avoid working the rainwater into the surface of the concrete. This is the biggest mistake most people ever make. Working water into the surface can most likely wash out the concrete that hasn’t completely dried yet. Moreover, it can weaken the density, mixture, and structure of your project.

Don’t pour dry cement onto the concrete to soak up surface water. Doing this will only weaken up the top layer. Just because there is water on top of your unfinished concrete doesn’t mean you could eventually pour cement to harden it up. Most likely, the dry cement will form weak lumps. Later on, you will find it hard to remove these lumps.

Use a float to push the water off the edge of the slab before you start to finish. This helps remove rainwater more effectively without scraping off the unfinished concrete on your driveway.

Solutions For Rain-Damaged Concrete

The worst thing that can happen to your concrete is when it is completely damaged by the rain. For sure, the water will wash out at least 30 to 40 percent of the surface. The following are the most common problems when the rain pours before the concrete has completely dried up.

Dusting

Surface dusting happens when the dried cement tries to separate from the surface because of sudden rainfall. To remove specks of dust, you simply need to mop out the surface of your concrete. The bad side of dusting is that the particulate matter from the surface can mix up in the air and cause irritation.

Surface Scaling

Scaling happens when the unfinished surface of hardened concrete is scraped as a result of being exposed to the rain before it has completely dried up. Flaking can also happen due to exposure to a very low temperature or thawing. Generally, it starts as localized small patches which late become larger.

It can expose more areas when not given attention right away. If this happens to your garage area or concrete pathway, you need to recoat it sooner. The issue can grow bigger as your vehicle passes by it from time to time.

Craze Cracking

Craze cracking happens when random cracks develop on the surface of your concrete. This could be due to ordinary wear and tear, or it can also happen when the rain pours to a block of unfinished concrete.

How long does concrete set before you can use it?

The amount of waiting time for concrete to be finally put to use depends on a variety of factors. For example, thinner applications can dry more quickly than thick ones. The following are other factors that you need to take into consideration.

  • Size – How big is your concrete project? Are you applying concrete for your garage or your pathway?
  • Mixture – How dense is your mixture? Are using pure cement? Or are you mixing sand and cement?
  • Time – Are you applying concrete during hot weather days? If you are trying to apply concrete during the cold winter months, the low temperature can affect the drying rate of your concrete.

On average, concrete can take 24 to 48 hours to set. This is for pathways and garages with average thickness and standard mixture. During this time, you may start walking on the surface but due to t eh nature of concrete consistency, it is essential to avoid heavy equipment during this period.

This helps prevent damages to your concrete as mentioned above. As much as possible, cover your concrete in case the rain starts to pour. Prevention is better than curing the damage later.

Water can prevent the moisture in the new concrete from evaporating. Hence, there is a tendency that the rainwater can get mixed up with the cement on the surface and prevent the middle from drying up. As soon as you step on it, the concrete will eventually sag or crack.

If you have already completed the finishing process, rainwater may no longer cause damage. But you have to make sure that the slabs are left untouched. Are you planning to apply concrete on your pathways, patios, or garage? Stay tuned for more tips on how to handle concreting projects.

Home Pro Partners

Home Pro Partners

Skilled laborers... publish a Home Pro Partner profile and invite trusted referral partners to your company profile.

Reach new customers with Home Pro Partners, no lead fees, no gimmicks, no hassle.

Is ceramic tile good for shower walls?

Is ceramic tile good for shower walls?

Is ceramic tile good for shower walls?

Ceramic tiles are ultimately popular for shower walls because they are long-lasting and durable. If you have chosen light fixtures, such as a vanity mirror or a bathtub then the more you need to consider using ceramic tiles. Today on the blog, let’s look at some reasons why it may or may not be good for your shower walls.

The Benefits of Using Ceramic Tiles for Your Shower Walls

Wondering whether using ceramic tiles for your shower walls is in any way better than other materials/ We’ve got the best list of the benefits of using these materials for your shower walls.

It is durable.

Ceramic tiles are very durable. When it comes to the composition and material quality, there is no surprise that ceramic tiles are on the top lists. This is why it also makes a great material for your shower walls.

Ceramic tiles are also easy to clean and maintain. They can last for years with very little care. Since they are durable, they also make great material for the underfoot, shower surrounds, backsplashes, and countertops.

Grade 1-2 is enough strength of ceramic tiles that you can use for your bathroom. However, if you have kids or higher levels of traffic, we recommend that you choose a higher grade to accommodate extra wear and tear.

It is waterproof.

Of course, when you choose materials for your bathroom walls, you would want something that is waterproof. The bathroom is the one in your home that is most exposed to water. Moisture can easily build upon the ceilings and walls as you use your hot shower, wash clothes, or bathe in the tub.
Ceramic tiles offer waterproof capability that stops water from absorbing through the walls. Moreover, you can easily wipe excess water and moisture on its surface.

It is Environmentally Friendly.

Many people presume using ceramic tiles to be harmful to the environment. This is why many homeowners turn to cork or bamboo floors to reduce their carbon footprint. But you don’t realize is that ceramic tiles are actually environmentally friendly.

If you buy post-industrial ceramic tiles, you can help the environment without sacrificing the aesthetics of your bathroom. Moreover, since ceramic tiles are more durable, you can save time and manpower doing repairs from time to time.

Sometimes, it is the repair that causes harm to the environment. It brings noise pollution and air pollution brought by the debris in the repair process.

It doesn’t trap pollutants.

Since ceramic tiles are glossy, any particulate matter would just slide through the surface. This makes the material a great option if anyone in your family suffers from asthma or allergies. The sturdy, durable surfaces don’t trap irritants, everyone in the family can breathe easier.

It is easier to clean and maintain.

Since ceramic tiles don’t absorb stains and scratches, they are very easy to maintain. You can just splash water on your tiles after you bathe. Or you can use a steam vacuum cleaner to clean and disinfect.

Since ceramic tiles are non-porous, they do not develop molds. Unless you soak them in water for a long period of time, they may grow some molds.

The design options are endless.

Ceramic tiles come in a variety of colors and designs, which gives you the freedom to smartly choose the best for your bathroom. Specific styles include wood-look, glossy white, metro brick, and encaustic-effect. You may go for classic colors like white, black, or beige. Or you may also go for bold ones to create a statement in your bathroom.

Ceramic tiles also come in various sizes. You can choose between 10cm x 10cm or 60cm x 120cm. Depending on the size of your bathroom, you need to ensure that the size of your tiles is proportional.

What are the Cons of Using Ceramic Tiles for Shower Walls?

It has a low heat retention capacity.

If you install ceramic tile flooring in your bathroom, you should note that it has a low heat retention capability. That means it won’t be able to give you enough protection against the cold during the cold winter month.

To remedy this situation, you can add rugs and carpets to your bathroom. If you live in areas where snow is typical, expect to feel the chill when you step on the ceramic tiles. In any case, you may consider installing an underfloor heating system underneath the tiles. This will add thermal comfort to your new floor.
It is not the most affordable option in the market.

While ceramic tiles can last longer than other options, they don’t come cheap. Installing ceramic tiles for your bathroom walls and floors can cost more than installing linoleum. Nevertheless, this expensive price is compensated with longer durability.

On the other hand, ceramic tiles cost less than granite, marble, and other high-end tiles. If you want your bathroom to look elegant and shiny, you should consider using ceramic tiles.

It requires a professional for installation.

While installing ceramic tiles, it is best that you hire a professional to do it. Measuring and cutting tiles to fit corners and conspicuous spaces can be difficult for rookies. Hence, you need to spare some extra budget for the installation.

Vinyl and linoleum floors require less effort. But while you can DIY its installation, it is not the best option for bathrooms.

The Bottomline

Ceramic tiles are great for bathroom walls and floors. Although they are not the most affordable option, they provide the durability you need for them to last for years. They are also very easy to clean and maintain, helping you save time and money for maintenance.

Since they come in various colors and designs, you can freely choose the color that best suits your shower walls. Got a small space? No problem.

Ceramic tiles come in various sizes to fit every bathroom’s needs. You can choose smaller tiles to be in proportion for your smaller bathroom or opt for the bigger ones.

Home Pro Partners

Home Pro Partners

Skilled laborers... publish a Home Pro Partner profile and invite trusted referral partners to your company profile.

Reach new customers with Home Pro Partners, no lead fees, no gimmicks, no hassle.